Asset Inventory Form 3
Note: The role of the logged-in user must have access to the Asset Inventory feature in order to perform an asset inventory count in the IntelliTrack Mobile application.
Inventory-Assets Form 3 is designed to be used when adding NEW assets to the asset inventory. In addition, you may assign a serial number, assignee, and condition to the new asset.
With Form 3 you may use the Lock feature to expedite asset inventory scanning of new assets. You may use the Lock feature to set a default value in a field, or to customize the prompting sequence (if an optional field is not used, such as the Assignee, Condition, or Serial #, you may lock the field with a blank value so that you do not have to continually scan it).
Asset Form 3 is set at the User Preferences form; see "Asset Inventory" for more information.
- Select Inventory > Assets from the Main form.
- The Inventory - Assets form appears.
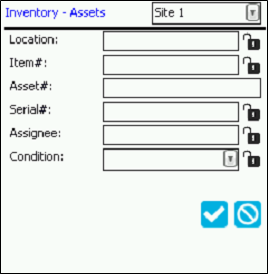
- Site (required): The default site of the logged-in user is automatically displayed in the site field along the top of the form. An asset inventory may be performed for a location at this site. If the logged-in user has access to another site, it will be available in the site drop-down list and may be selected
- Location (required): scan or enter a valid location in the location field. If all of the new assets are being placed in this location, you have the option to lock the location so that you do not have to continually scan it. To lock the location, tap the
 Lock icon. The location will remain locked
  while the new assets are being added to this site-location.
 - Item# (required): Add the item to which this asset is added to. You must add the asset to an asset item, which must already be contained in IntelliTrack. If all of the new assets are being added to this item, you have the option to lock the item so that you do not have to continually scan it. To lock the item, tap the Lock icon. The item will remain locked while the new assets are being added to this site-location.
- Asset# (required): Scan or enter the asset number in this field.
- Serial# (optional): If this asset contains a serial number, enter it in this field. You have the option to lock this field. This is useful if the assets that are being added do not contain serial numbers, as this field may be skipped during asset scanning. To lock the Serial# field in a blank state, tap the Lock icon. The field state will remain locked until you change it.
- RFID Tag Number (optional): If the asset item uses RFID, an RFID tag number may be added for this asset in this field.
- Assignee (optional): If this asset is associated with an assignee, enter or scan the assignee into this field. You have the option to lock this field. This is useful if all of the assets being entered are associated with the same assignee or if the assets are not associated with any assignee. In either case, when this field is locked, you do not have to continually scan it. To lock the Assignee field, tap the Lock icon. The field value will remain locked while you are adding the new assets. The field state will remain locked until you change it.
- Condition (optional): If this asset has a condition, select the asset condition from the list of condition lookups. You have the option to lock this field. This is useful if all of the asset are associated with the same condition or if the assets are not associated with any condition. In either case, when this condition is locked, you do not have to continually scan it. To lock the Condition field, tap the Lock icon. The field value will remain locked while you are adding the new assets. The field state will remain locked until you change it.
- Press the Enter key on the device or tap the
 Save icon to add the asset to the location.
 - Continue scanning the assets, repeating steps 1-10 until you are finished.
- When you are finished scanning the assets, tap the
 Cancel icon to close the Inventory-Assets form and return to the Main form.